Recording a video
Recording a video on Apple Vision Pro
| 1 | Open the camera app by simply pressing the Left button on the top of the headset which you can see here highlighted in blue. | 
|
| 2 | Once the camera app is open, select “Video” if it is not already selected. | 
|
| 3 | Press the Left button again to start recording. | |
| 4 | Press the Left button to stop recording. | |
Uploading a video on Apple Vision Pro
| 1 | Find the WorkWise app on the Apple Vision Pro home screen. |
|
| 2 |
When opening the app for the first time, you will be prompted to grant permissions for the app to access the Photo Library. Click “Grant Permissions.” Note: this is a one-time screen, so if you have already done this, you can skip to step 4. |

|
| 3 | You must grant full permissions by clicking “Allow Full Access.” | 
|
| 4 | After granting permissions, you will be prompted to log in. Log in with your selected method (email/password or SSO). | 
|
| 5 |
After logging in, you will see the following home page. On this screen, you will see a guide for opening the camera app, and a button that says “Import Video.” If you have not yet recorded a video, you can record a video by following the guide shown in the app, or by reading the Recording a video on Apple Vision Pro section in this guide. If you have already recorded your video, click on “Import Video.” |

|
| 6 | Select the video you want to upload. | 
|
| 7 | You can click the play button to watch the video, or click “Use” to proceed. | 
|
| 8 |
After clicking “Use,” you will be prompted to enter a title and description for the video. The video title is required but the description is optional. Note: If you do not enter a description, one will be automatically generated after upload. Tip: if you hover your eyes over the microphone icons for in the title and description text fields, you can activate a speech-to-text functionality where you can use your voice to type out the title or description. Once you enter a title (and optional description), click “Next.” |

|
| 9 | After clicking “Next,” you will see a final screen to confirm the video + title + description. If everything looks good, click “Upload Video.” If you want to make any changes, click “Cancel.” |
|
| 10 | After clicking “Upload Video,” you will get a notification that the upload process has started. Once the upload has succeeded, you will see an alert. Now the video will be processed and once ready, it will be viewable through the WorkWise web app which you can access on any desktop or mobile device. |
|


Accessing videos and other generated material
Homepage
To access videos and documents that were uploaded and the material that was generated from them, go to the WorkWise web app on any device with internet browsing capabilities via the following link: https://workwise.strivr.com
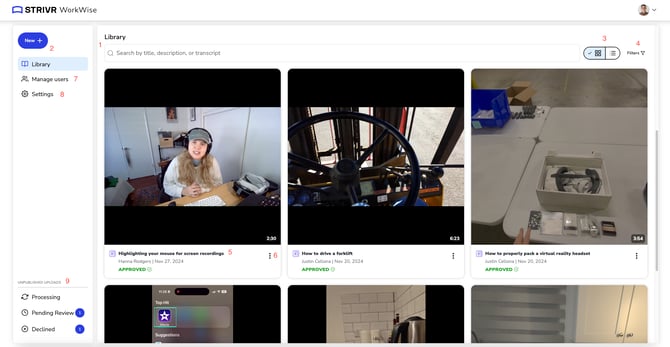
After logging in, you will see a homepage that looks like this. This page is where you can find all of the uploaded videos and documents.
Grid View
List View

Grid View layout
| 1 | The Library | The library is where you will find all of the published content in your tenant. You can search for videos and documents by their title, description, or the generated transcript. | ||||||
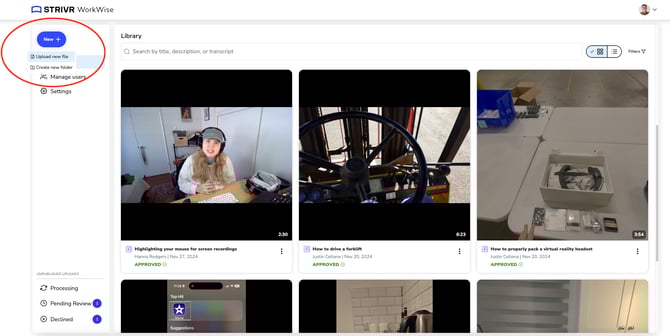
| 2 | ‘New’ button | Use this button to upload videos or documents, create a folder, or start a new screen recording. | ||||||
| 3 | Change layout | Use this button to toggle between the grid view and the list view | ||||||
| 4 | Resource Type filter |
Use this button to access the following content filters:
|
||||||
| 5 |
Video/document title, uploader, upload date, and approval status.
|
|||||||
| 6 | Resource options |
An options menu for the video or document. The current options are to move or delete a video or document. |
||||||
| 7 | Manage users page |
This page allows you to add/remove/manage your users. You can grant them certain roles/permissions within your tenant. |
||||||
| 8 | Settings page which contains the following settings |
|
||||||
| 9 | Unpublished Uploads page |
These pages allow you to easily find content that is unpublished because it is in one of a few different states. These states are as follows:
|
||||||
Viewing a video
 |
||
| 1 | The video | The video is available to view |
| 2 | Video description |
The video description can be edited by users with the permissions to do so. Click on the “edit” icon to edit the description. |
| 3 | AI-Generated description |
If no description was provided by the user, we automatically generate one based on the contents of the video. In that case, we show a message letting users know that the description was automatically generated. If someone edits the generated description, we will amend the message to show who made the most recent edit, and when the edit occurred. |
| 4 | Edit button | Clicking this button will allow you to edit the the description manually. All text fields on this page have an edit button allowing you to edit all text, generated or not. |
| 5 | Transcript search | You can search the video transcript by typing in key. It will search by looking for an exact word match. |
| 6 | Video transcript | You can scroll through the entire transcript to find specific moments in the video. You can also see the video timestamp next to each section. You can click on a section to go directly to that part of the video. |
| 7 | Video controls | You can mute/unmute the video, enter full screen mode, change video playback speed, toggle on/off the closed captions overlaid on top of the video, and edit the video’s audio. |
| 8 | Video Chapters |
This tab will show the video’s “Chapters,” or segmented sections of the video. Each chapter has a thumbnail, a title, and a timestamp. Click on a chapter to go directly to that part of the video. |
|
|
||
| 9 | Instructions tab |
The Instructions tab will show automatically-generated work instructions if they were able to be created from the video. Videos that take the form of a tutorial, step-by-step guide, or walkthrough will typically create nicely-formatted step-by-step work instructions. The work instructions can be edited by users with the right permissions. |
|
|
||
| 10 | Video Summary tab | This tab will show you an automatically-generated summary of the video. Summaries are meant to be relatively short (around 3-5 sentences) and they can be edited by users with the right permissions. |
| 11 | Approval status | This shows the video’s approval status and Admins have the ability to change the status at any time. |


Uploading a video or document from the web

| 1 | Choose the file you want to upload either by clicking “Browse files” or by dragging the file directly into this area. |
Current supported file types include .mp4, .mov, and .pdf (max file size of 20GB) |
| 2 | Enter a title for the video/document (max. 100 characters). | Titles must be unique so do not use the same exact title when doing additional uploads. |
| 3 | Select the language of the resource you are uploading. | If you are uploading a video, select the language that the video was recorded in. If you are uploading a document, select the language the document is written in. |
| 4 | [Optional] Enter a description for the video/document (max. 5000 characters). | If no description is entered, one will be generated automatically by AI after the file has been uploaded. |